
All music of Dasinu is recorded in homestudio's. I get a lot of questions of musicians that are also interested in using a home studio for recording their music. What do you need to setup a studio? How to get started? How does it work? On this page you will find some information that can help you on your way. The following topics will be addressed:
The following will not be complete, the space here is too limited. If you have questions after reading this you can always contact me. In the menu you will find a contact form
Introduction
From the moment I tried to play guitar, the art of recording has fascinated me. In my teens I experimented with the impressive Akai tape recorder with the sound-on-sound feature. 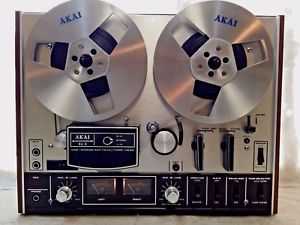 For days and days I was busy with an acoustic guitar, a cheap microphone and a few pots and pans recording songs like 'Hey Joe'. Alas, in the last decisive take of this song my mother called me for diner. From that moment on her yell 'Diner is ready!!!' was imprinted in the impressive chorus of the song.... for ever! Hendrix would be proud!
Go to index
From tape to disk
In earlier times, when I played in all kind of bands it was the dream of every musician to have the possibility to record their own music in a somewhat professional way. But the highest you could achieve in that time was e.g. a Tascam 4-track recorder (with a cassette!). Expensive and with limited possibilities.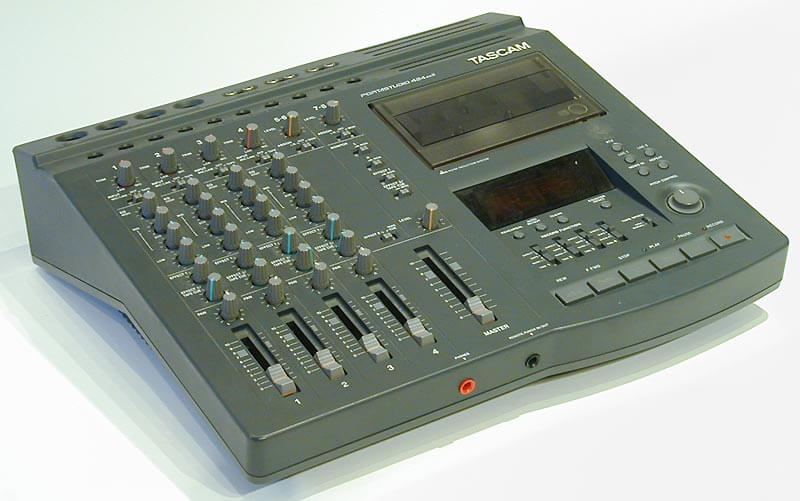 But luckily for musicians IT made a giant leap since then, with digitization as a key concept. Almost everything that used to be analog (e.g. pictures, movies, music - who remembers 'long play records'?) is now available in a format consisting of only ones and zeros. This has huge benefits for audio and video, because it has a consistent high quality in a compact format. Furthermore it's easy to edit and to copy without quality loss. For us musicians, the benefits go even further. To record and edit music these days you can come a long way with only a PC - that you already own - and of course some other hardware. Other musicians for your band? Just install a virtual bass player and drummer and you are ready to go!
Go to index
Software then and now
Software for recording and editing music is within the reach of the average musician for a while now. Not only because professional applications are now widely available, at all price points. But also because the computing power, the memory and the storage for running these types of programs smoothly is no longer state-of-the-art technology but readily available to everyone. About 20 years ago, the possibilities were still very limited and certainly not comparable with what is available now. But even then, it was possible to achieve results with a lot of fiddling, perseverance and patience (by the way, my results from back then sound terrible when I listen to it now). Programs that I used to record were e.g. n-track (still exists but is no longer a big player) and a forerunner of CoolEdit Pro (now called Adobe Audition).
 In addition, I used various programs - sequencers - such as FruityLoops and Reason to create drum tracks and synthesizer sounds. By the way, these products (sequencers and recording software) have merged: with Reason and FruityLoops you can now record, and with a program like Reaper you can also 'sequence'.
Nowadays there is a wide range of all kinds of smooth running software on the market. Not only recording software (DAW: digital audio workstation). There is also a huge choice in sample libraries, plug-ins (additions to the DAW with which sound can be manipulated) and Virtual instruments, such as midi controlled virtual pianos, guitars or basses. Finally there is all kinds of software to edit and measure the audio, e.g. for mastering your music. Twenty years ago the limitations were with the software, now the musician is the limiting factor (at least in my case).
Go to index
How to start
What do you need to start recording music? In short: a PC or Laptop, software for recording music (a DAW: digital audio workstation), a sound card and monitors.
Computer
To start, a normal Desktop or Laptop will do. Of course audio processing requires a lot of computing power and memory. For larger projects with many tracks and many plug-ins a powerful PC with at least 8 Gb ram is recommended. Nevertheless, starting small is certainly possible.
Software
Obviously you have to install software for recording and for editing your audio. There are many good DAWs available. ProTools, Cubase, Reaper, Magix, Cakewalk, Reason etc. All these packages have a lot of functionality and my experience is that there may be a slight learning curve to getting comfortable with the functionality, settings and menus. Do not give up too quickly and check out the YouTube tutorials (or the manual) when you get started. Later on more about the DAW and plug-ins.
Audio interface
You also need a soundcard or an audio interface (which I think is the same thing). Maybe you already have such a device. Many 'modelers' (Boss, Line6, Kemper etc) and 'modeling amps' (Boss Katana, Yamaha thr) already have a built-in sound card. You connect it via USB or Firewire to your PC. After installing the driver you will find your sound card in the DAW (somewhere in the options or preferences menu). You can then get started, if you have at least ...
Monitors
..... connected monitors (speakers) or headphones to your sound card. Studio monitors (and studio headphones) have high quality speakers and are specially designed for listening to music while recording, mixing and mastering. You can of course - if you are just starting - use a 'normal' audio system. Chances are that you can make your music sound great on that system, but that it sounds terrible on any other system. A good set of monitors is essential, but pricey. Here you can read more about monitors.
Below more about all these components.
Go to index
Digital audio workstation (DAW)
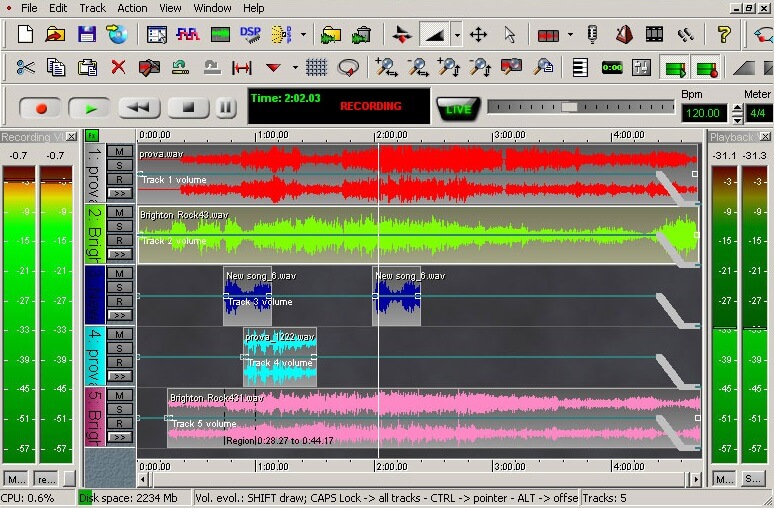
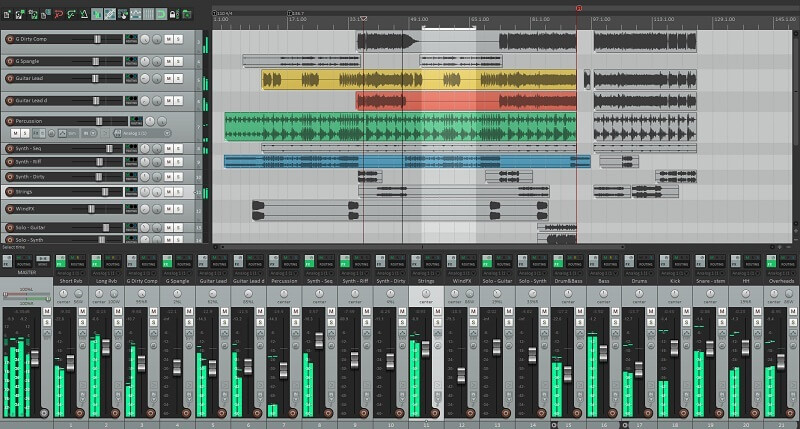
The software you need to record (further called DAW) has already been discussed a few times. There are many good DAWs available, examples are Cubase, ProTool, Cakewalk, Garageband etc. Below is an image of Reaper, my absolute favorite. At the top you see a number of tools. On the left the settings per track, on the right the 'lanes' in which the audio or midi is recorded, and below the mixer. All information in this example is on one screen, but in practice you will put all kinds of components, such as the mixer and the tools, in separate windows that can be called up when you need them. This to keep a good overview.
 What is a DAW and what can you do with it? Roughly speaking a DAW has two main functionalities: you can record, play and edit analog instruments (guitar etc) just like you can with a tape recorder. And you can use the midi protocol (I come back to that later) to control all kinds of software (plug-ins) in order to produce music. The sky is really the limit: virtual drums, basses, guitars, even entire orchestras. The combination of analog recording and midi gives us unprecedented possibilities: bass and drums using midi and 'virtual instruments' as a basis, on top of that 'real' guitars and vocals. Not satisfied? Maybe we should add orchestra for the chorus....
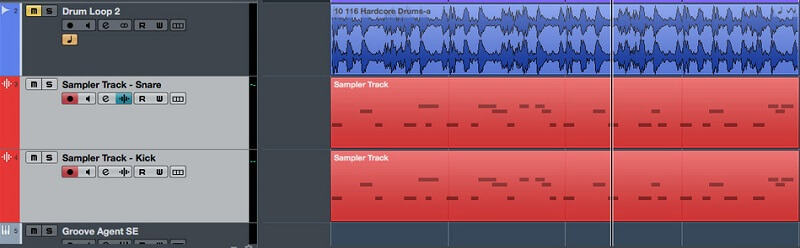
Below you can see what that looks like in a DAW, and in this case Cubase. The top track is a recording of real drums. You can see the wave form of an audio file there. The bottom two tracks are midi tracks. You can see the little 'bars' - in fact, those are music notes - that control the midi instrument. In this case a snare drum and a bass drum. In that audio file and midi files you can also simply cut (e.g. on the spot where the line / cursor is positioned) to reuse bits of audio, par example to loop it.
 In addition to recording, you can do a lot more with a DAW. For example enhance audio by adding reverb, delay or any other effect (see plug-ins ). Or edit audio by copying, cutting and pasting parts of a recorded piece of music and replace parts of your recording by new parts (punch-ins). Imagine you played a beautiful solo, but that one note is not up to standards. You can re-record only that little faulty part, endless if necessary, and keep the rest intact. A good DAW has tools to ensure that the transitions to the new part can not be heard (within certain limits of course).
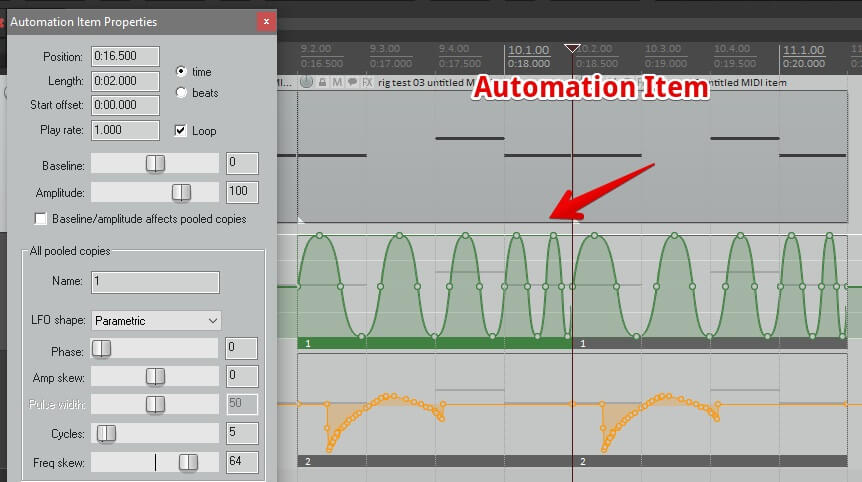
With a DAW you can also automate all sorts of things. This applies to both audio and midi tracks. You can e.g. adjust the volume in your track at certain moments, turn effects on and off, pan (change the position of your instrument in the sound field - left / right) etc. This can be done in two ways: you can adjust everything by hand while playing a track. For example adjust volume somewhere. Record and save the changes so that they will be applied next time you play the track. You will then see the knobs turn and faders slide without touching them. Or you can 'program' all sorts of parameters. You can do this by adding extra 'lanes' to your track, e.g. a 'volume' or 'pan' lane in which you indicate how the faders and buttons should slide and rotate. Below an example of a midi track (top) with two automated parameters below.
 And finally you can mix and master your song. Later more about this.
Mind you, an average DAW is complex and has a manual of about 1000 pages. So there may be a slight learning curve to getting comfortable with the functionality, settings and menus!
Go to index
Plug-ins
A DAW has a lot of functionality, but still it's a rather 'bare' piece of software. The real fun stuff begins when you also plug in so-called VSTs (Virtual Studio Technology) or plug-ins. Btw, the AAX/RTAS plug-in format for Mac OSX-based music platforms and ProTools is not discussed here, cause I don't have experience whith those.
Usually a number of plug-ins are supplied with your DAW, but there is also a large number of VST's available from third parties, such as Native Instruments, EastWest, Toontrack, Spectrasonics and so on. If you search the internet you can even find free - high quality - plugins.
Installing a VST is fairly simple: you install the VSTs in a certain folder, and set up the DAW to search for VST's in that folder. The rest follows automatically. Pay attention, if you use a 32 bit DAW you also have to use 32 bit VSTs, with a 64 bit DAW (like for Windows 10) you need a 64 bit VST. A 32 bit VST can often be used in a 64 bit DAW, but that's not optimal.
There are roughly three types of VSTs:
VSTi's or Virtual Instruments
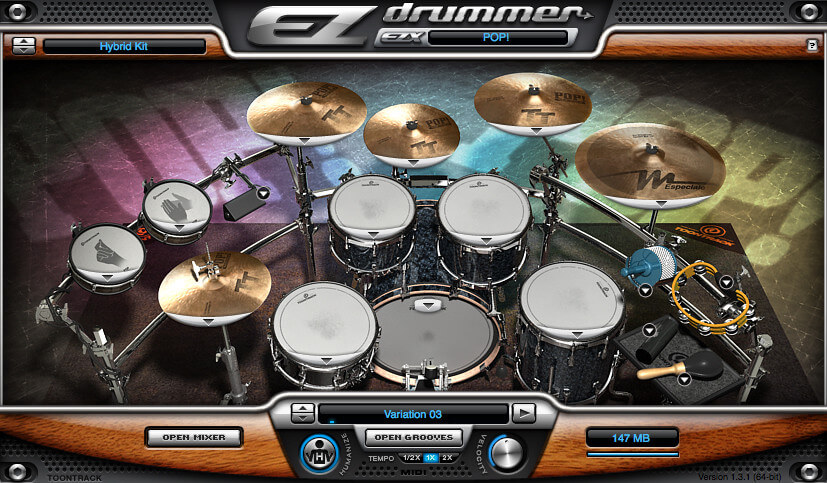
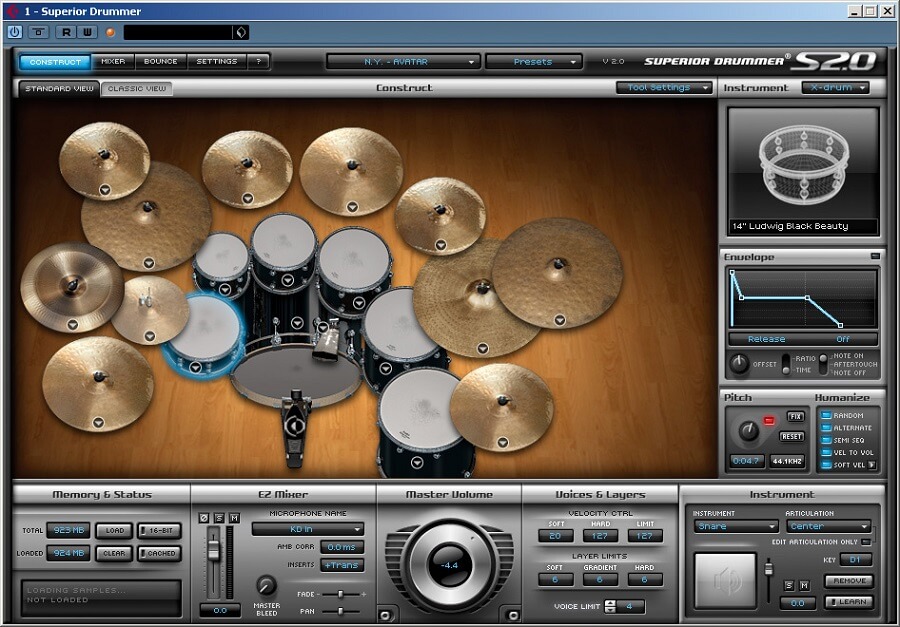
VSTi's are virtual instruments like drums, orchestras, wind instruments, synthesizers, pianos, organs, basses, guitars etc. These are controlled by means of the Midi protocol. VSTi's come in all shapes and sizes, from limited synthesizers to packages that work with samples (recordings) of real instruments. For example, ToonTrack's Superior Drummer is a well-known drum VSTi. All parts of the drum set, like the cymbals, bassdrum and toms are recorded at different sound levels and you can imagine that this counts up to a huge number of samples. That sounds fantastic and very realistic, but the downside is that one digitized drum set can contain about 20 Gigabytes of data. It therefore takes ample computing power and storage capacity to run it smoothly. Adding RAM memory is one of the easier ways to boost your PC performance. These samples can then be loaded into the RAM memory so that they can be loaded (played) ultra-fast.
EZdrummer, also by Toontrack, is a more compact version with which excellent results can be achieved. A symphony orchestra? Also possible, check e.g. the 'Symphonic Orchestra' of EastWest. Pricey packages, that is! 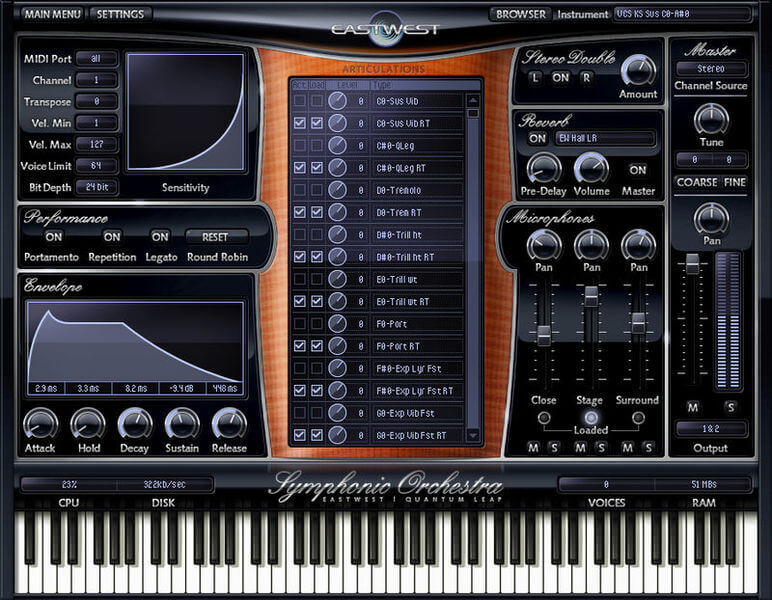
VSTs
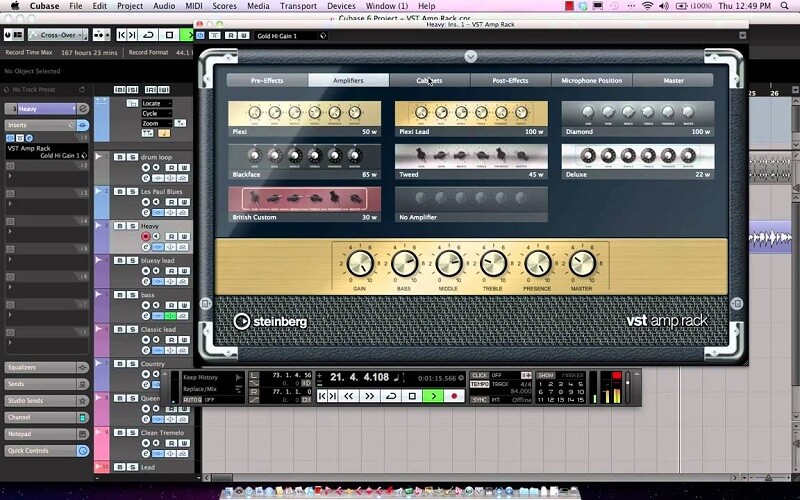
Plug-ins with which you can to manipulate audio in real time are called VSTs. You load these in the 'effect slots' of your track. Again, there are countless variants, but the most essential are the the reverbs, delays, compressors, and pitch and modulation effects such as choruses, phasers, flangers. Also very useful are amplifier models, of e.g. Studio Devil, Positive Grid Bias and Amplitube, with which you can replicate just about any commercially available amplifier and cabinet. So you record a clean guitar and end up sounding like Van Halen. Cool!
Always record your instrument 'dry' and add your effects in a subsequent phase of your recording process. In that way you remain flexible until the end of your project. 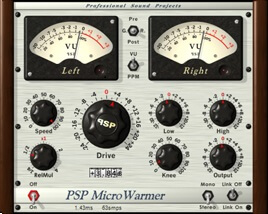 A reverb that sounded fantastic during recording may turn out to be too much in the endresult. If that reverb is 'hard' recorded (imprinted) then the only option is to re-record the entire track and that's a waste of time and energy.
The VST that I use most is the PSP Microwarmer. A very nice sounding compressor that requires very little computer capacity.
VSTs for Mastering
Finally, the third category consists of VSTs that have been developed especially for mastering your music. These are software suites that contain all the necessary components for the final step in the production process of your music. In the chapter on Mastering more about that.
Go to index
Sound card
The sound card or audio interface (which I think is the same thing) is - in addition to a PC and software - an essential part of your recording chain. It's the heart of your home recording studio. It converts your analog audio to digital (so it can be read by the
software in your computer.) And it convert the digital audio from your computer back to analog (so that you can hear what you recorded and mixed.)
Maybe you already have such a thing at home. Many modelers (Boss, Line6, Kemper etc) and 'modeling amps' (Boss Katana, Yamaha thr) have a built-in sound card. You connect an external sound card via USB or Firewire to your PC, an internal sound card is of course build in, in your computer.
Initially, most sound cards were equipped with a Firewire connection, nowadays USB audio interfaces are also widely available. Although it does not make a lot of difference in terms of speed and quality, in my opinion an USB audio Interface is preferable. Some Firewire soundcards have problems with certain (non TI - Texas Instruments chipset) firewire cards in the PC. An USB interface is more generic and doesn't have that kind of issues.
A sound card is supplied with an ASIO driver, which after installation is recognized by your DAW. Note when purchasing a sound card that the operating system of your PC, often Windows 10 (64 bit), is supported. Especially if you purchase a second-hand interface, pay attention to whether recent drivers are available. Also pay attention to the number of inputs and outputs. If you record one guitar or microphone at a time, as is often the case with recording at home, and you play audio on one set of monitors, you only need two (stereo) inputs and two (stereo) outputs. These models are a lot cheaper than the models with multiple inputs and outputs.
Below the Motu 828 mk2 that I used for a while. A lot of possibilities, but also not very user friendly, akward in use (so I sold it...).

So, that's all about the sound card? Nope, there some other important things to address: sample-rate, bitdepth, latency and direct monitoring:
Sample-rate.
The number of samples or 'snapshots' that the sound card creates (per second) of an incoming analog sound signal is called the sample rate.
The 'AD converter' (Analog-Digital converter) in a standard sound card does this 44100 times per second (44.1 KHz). CD's for example are based on this standard. More professional sound cards can also handle 48 Khz (widely used in the film industry) and 96 or 192Khz formats.
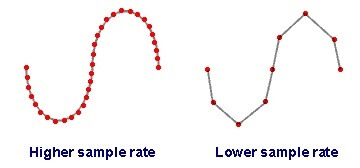 Theoretically, with a higher than 44.1Khz or 48Khz sample rate you should be able to achieve a better sound quality in the (extreme) high frequency range. However, the general opinion is that the audible improvement is minimal, or even completely absent. A disadvantage of high sample frequencies is that your files become much larger and that you need more storage and CPU capacity when processing it. So, not really recommended in the homestudio (I use 48Khz).
Bitrate or Bit depth.
The number of bits with which a sample is processed is called the bitrate or bit depth. Simple sound cards process a sample in 16 bits. A CD is also based on this 16 bit format. More professional sound cards can also process samples in 20, 24 or 32 bits (the software - DAW - must be able to handle this). The advantage of a higher bit format is that a sample is recorded more accurate, and will be a better copy of the original analog sound. 24 bits gives e.g. 16,777,216 possible levels to store information, compared to 65,536 levels in a 16 bits format.
In practice this means that your recordings will have more headroom: less clipping (digital distortion), a high dynamic range and more accurate sounding effects. For example reverb tails will sound better. Don't expect huge differences, the quality improvement is subtle.
Note: Eventually you have to convert your music back to 16 bits because this is the standard format for mainstream music player devices. You do this at the very last moment, when creating (rendering, exporting) your definitive wav or mp3 file. This process is called "dithering". Most DAWs and Maximizers have this functionality built-in.
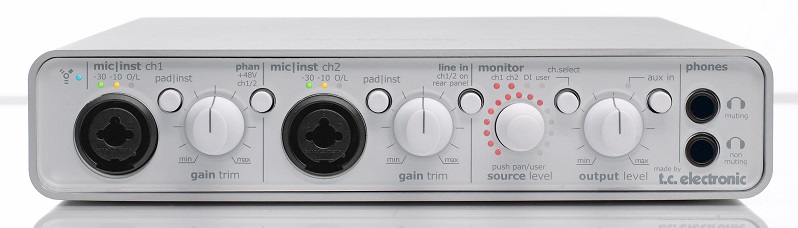
Below the TC Electronic Konnekt 8. Together with a chained Konnekt 24 my favorite audio interface.
The latency of a sound card / direct monitoring.
With a standard sound card you will notice that if you play a tone on your guitar, you hear it a bit later through your speakers or headphones. This is because the PC, software and the sound card need time to process this sound and transport it to the DAW and back again. This is causing latency.
The transport is organised in packets of data. The size of the packets is determined by the buffer size of the sound card. You can adjust the buffer size in the configuration menu of your card and often also in the DAW.
A large buffer size is 1024 samples. The audio interface waits until the buffer is filled and then sends the packet to the DAW. A small buffer is something like 32 or 64 samples. This will result in smaller packets of data and a more frequent exchange of information between the soundcard and the PC. As a result the latency when using a small buffer will be lower.
When you are recording a lag is very irritating, it's practically impossible to stay in sync with the music you want to record with. Every soundcard has latency, but with high quality soundcards and drivers the buffer can be set very small, resulting in an inaudible delay (5 to 10 milliseconds). Alas, in reality this low latency is not always achievable because it consumes a lot of cpu resources. In a big project this might result in stuttering, distortion and audio drop outs. So if you encounter problems with that, adjusting the buffer size will likely solve the problem.
Luckily a good soundcard has a 'direct monitoring' function. This means that the sound of your guitar is routed directly - without delay - to your monitors, together of course with the music you are recording to. There still is a delay because of the recording process, but you cannot hear it anymore, it's handled in the background. Mind you, you will not hear the effects, like amp simulators, that you loaded in the effect slots of your DAW. They are by-passed.
In my opinion a home studio cannot do without a soundcard with 'Direct Monitoring'.
Go to index
Monitors

There is a lot to say about studio monitors and studio headphones. Studio monitors (and headphones) have high quality speakers, especially designed for listening to music while recording, mixing and mastering. They have a flat frequency characteristic and a focus on accurate audio reproduction. Nearfield monitors are designed for listening at a distance of 1 to 1.5 meters (most commonly used in the home studio) and farfield monitors for audio reproduction in large studios.
 The positioning of monitors is very important, make sure that your monitors are always at ear height (see the picture above). Just move your head back and forth in the sound field, and you will hear how much difference this makes. Also the correct setting of the frequency characteristic - tuned to where the monitor is positioned, e.g in a corner or for a window - is important. You can adjust this at the back of the monitors. All manufactors will give instructions about how to do this in the manual, read it carefully.
You can of course - if you are just starting - use a 'normal' audio system. Chances are that you can make your music sound pretty great on that system, but that it will sound terrible when you play it on any other device. It is therefore important that you hear everything correctly, neutral and precisely. Especially during mixing and mastering. Only in this way can you produce music that sounds good everywhere. A good set of monitors is therefore essential, but pricey. Although entry-level models (from KRK for example) are nowadays quite affordable.
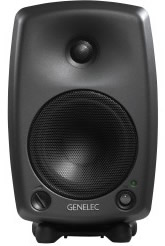
It is important that you always have two sets of monitors at hand. One set of studio monitors that you use for the recording process and one 'normal' set of speakers for reference, so you can check your mix on a 'cheap' systems too. I use the Genelec 8030a nearfield monitors (see picture), and an Altec Lansing 2.1 set for reference.
Recording a guitar
Recording a guitar, or any other analog instrument, is actually quite simple. You create a new audio track in your DAW. In this track you select from which input of your sound card you want to record (the channel that receives the guitar signal).
To get your guitar sound in your sound card and DAW there are several possibilities: You plug a microphone in your sound card and position the mic in front of the speaker of your amp's cabinet. Or you use a modeler (like a Line6 Pod, Helix or similar) by connecting the modeler to your sound card. You can also use the line-out of your amp or, even more simple but doesn't sound very well, you can connect your guitar directly to the sound card. Of course, you connect to the correct input of your sound card: microphone and / or guitar usually in the pre-amp at the front using the XLR or 1/4" Hi Z inputs. Line-out of an amp to the line-in (usually at the back) of your audio interface.
A modeler is a special case. In addition to analog outputs, these usually have digital outputs (S/PDIF or ADAT). That makes sense, because a modeler creates a digital signal from your analog signal. So if you record via the analog line-out of your modeler (into the line-in of your audio card), you use an analog output that already is converted from analog to digital, and converted back to analog. Your soundcard will then again convert the signal into digital. If you record over S/PDIF or ADAT you stay in the digital realm, so a further AD conversion in the sound card is not needed. Theoretical recording via S/PDIF or ADAT is better, but I don't hear a difference. But that can be me...
 Finally, when everything is set correctly, you set the track to recording (record armed), you check whether your DAW receives the sound signal, you check the level of the signal (never in red, better too soft than too loud), select on which part of your track you want to record, and press REC (or whatever) to 'roll the tape'.
Go to index
Recording with midi
Midi is a collection of commands with which you can control all sorts of music related things in your studio. For example: select synthesizer X, play a C and add some vibrato. It's like the notation we use in traditional music, but more enhanced and electronic. So, how to use that in our Studio?
When we recorded a guitar we created an audio track in the DAW. For midi we create a Midi track. After that we select a virtual instrument, a synthesizer, drum software, a virtual wind instrument or whatever. We link this 'instrument' to the midi track we created. In the virtual instrument you indicate that the track (eg Midi channel 1) supplies the input (what has to be played) to the instrument. The instrument will then make sounds (hopefully music) and send the output signal back to your DAW.
You can route that output to a new track in your DAW, so that you can control the volume of the instrument's audio and add effects. You can also route the output of your virtual instrument to multiple channels. This is especially useful if it's an instrument with more components, such as a drumset or a woodwind ensemble. For example, to a channel for the snare, the kick, the toms etc. In this way you can balance the volume levels and add effects to the seperate parts of the instrument.
 Finally, but now it gets really complicated, you can route multiple midi tracks to one virtual instrument and then route the output back to multiple channels. So there are quite a few possibilities!
But how to add music to the midi track? Now we have everything connected, but we have a midi track with nothing in it. You can do that in two ways. By connecting a midi controller to your DAW. This is usually a keyboard with which you can send notes in the form of midi signals to your track and record them overthere. Or by drawing them with a pencil or a mouse click in your midi track. Every DAW has a 'piano roll' for this. In the picture below you see what that looks like.
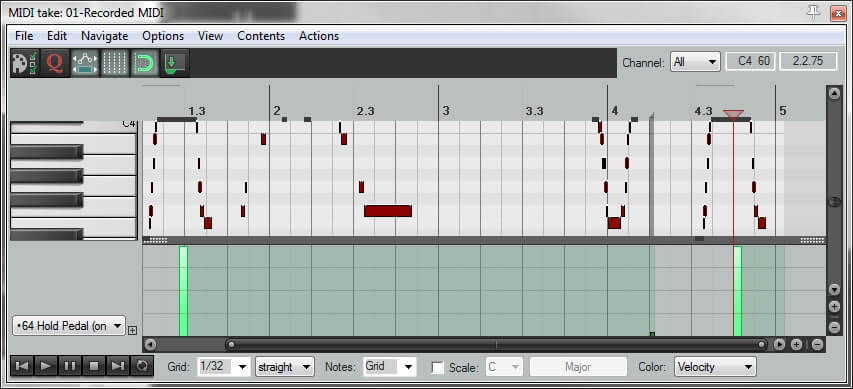 With those little bars, which you write with a 'pencil' or a mouse click you indicate what note should be played and what length it should have. In the lane below the screen you indicate how loud the note should be played (velocity). By the way, you can add more lanes at the bottom with which you can manipulate the notes even more (eg the pitch or vibrato etc, depending on the virtual instrument). For drums? Simple, the C note is e.g. a bassdrum, the D a tom etc.
When you have inserted all the notes and you play it, you might notice that it will sometimes sound mechanical. This is because no musician plays a piece of music like a robot. Most Virtual Instruments and DAWs therefore have the option to 'Humanize', with which the notes and velocity are slightly randomised to get a more organic feel.
Go to index
Mixing your music
Once all the instruments are recorded, we start with a difficult phase of the recording process: mixing. Mixing is all about creating a vibe or emotion to the song. It's done by balancing the volume levels of the recorded instruments and vocals and coloring the overall sound. Mixing is a specialised skill, good ears, patience, knowledge of 'sound images' and a good dose of experience are at least as important as good equipment. How can we achieve an acceptable result? My way of working is to make sure that all the parts I recorded already sound good, furthermore I make a raw mix after every recorded track. In this way I won’t have to do much mixing later on, and that saves time!
Always monitor at low levels or at least for the majority of your mixing time. This will save your ears and also allow you to make better mixing decisions! You can break this rule on occasion but only to check the mix at high volume, especially the low end. But most of my time is spent at low monitoring levels.
Also do not Mix for a long period of time. After a while you will get ear fatigue and chances are you will not produce a well-sounding mix!
When you're done recording, it is important that the volume on the master output faders is not too high. If your main faders are at 0db, you don't want your output 'in the red'.
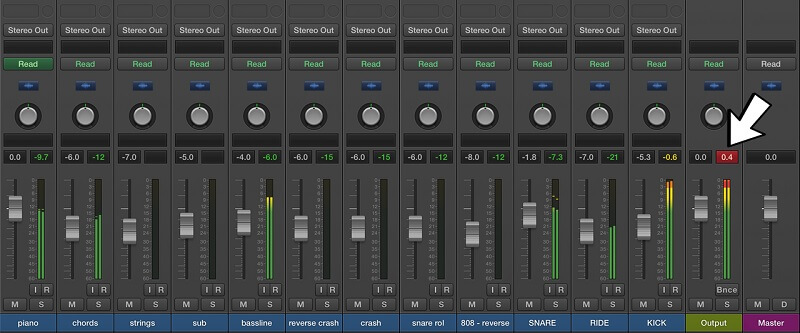 If that's the case select all tracks (if you use group tracks, do not select the underlying tracks) and then lower the volume of this whole selection. With most DAWs this can be done by moving one of the selected volume faders. If that is all ok, I will start with this raw mix.
The first step is to "mute" all tracks except the bass and drums tracks. This is the basis of your song and should sound really good. Apart from the balance between the toms, snare, cymbals, kick etc and the bass guitar, you have to make sure that the bass drum and the bass guitar are not in the same frequency range. If that is the case, you will probably get a rather muddy sound. A parametric or graphic equalizer is a great tool to fix that. If you want a real tight punchy bass sound (and bass drum sound, toms, snare) a compressor might do the trick.
When this drum-bass mix sounds good, then to the next step. I organize my project in small pieces. Therefore I already made groups of related instrument takes (e.g. several guitars that play a certain part) and of the drum set. You do this by 'routing' all tracks of which you want to create an in-between mix to a 'group'. So, instead of routing the output of a track to the end fader, you route it to a new track, that becomes a 'group track'.
All related guitar tracks go to the 'group guitar', all drums to 'group drums', all synths to 'group synths' etc. These group tracks are then routed to the master faders as stereo channels. If you work this way the mixdown will be simpler. Moreover, this 'group approach' has the advantage that you can now also apply effects to an entire group (eg a stereo spreader or a reverb), making it all a bit simpler.
Finally, do not think that you can fix imperfections during the mix, or that you can eliminate these errors later during mastering. Mixing (and mastering) is absolutely not intended for this. Make sure that each track already has the correct tone color and that no distortion (clipping) occurs anywhere. Only then you have a solid basis for a good mix.
Does your song sound balanced on your monitors, and does it sound as you intended? Only then you can start with the final phase: Mastering.
Go to index
Mastering your music
The purpose of mastering is twofold. First, this process is to ensure that all your songs have the same loudness level and sound. This is important if you make them available together, e.g. on a CD. Second, it is meant to further polish and clean-up your song after the mix. Don't forget: mastering is not for fixing faults. You go back and fix faults in the original tracks!
Compare the mix you made with a song from a commercial CD. You will notice in 99 of the 100 cases that your - unmastered - song is much softer and in some cases more 'thin' sounding.
How do you Master your track to get the same 'commercial' quality?
First of all you export your final mix to preferably a 32 bit wav file. You can import this file in your software like your DAW, or a specific mastering program such as WaveLab. You open a new project for this. You then add a number of plug-ins to the master channel. Normally these are (and also in this order):
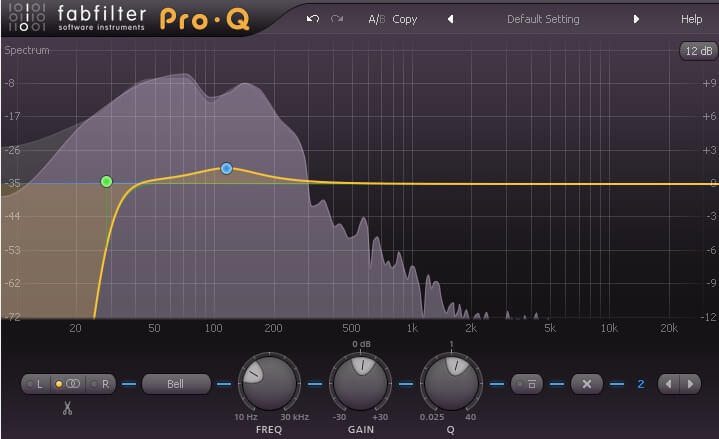
- A bass roll-off filter (see above). It will filter out all low "Rumble" and "DC offset" (anything below 20-30Hz). These are frequencies that you can't hear but that eat 'sound energy'. In other words, these frequencies will unnecessarily 'feed' your amplifier and try to get the loudspeakers moving. It's better to get rid of it.
- Possibly (if necessary) a plug-in to boost the high frequencies (the 'crisp and clear' sound). Such plug-ins are called Exciters. Examples are the Spectralizer from Steinberg or the Sonic Maximizer from BBE.
- A broadband equalizer to correct for unevenness in the eq of the mix, or to accent certain areas.
- A compressor, maximixer or limiter to boost the perceived volume (the 'Loudness'). If the overall volume of your song is too low, you have to boost it without causing distortion. You can use a limiter or maximizer for this (the Steinberg Waves bundle contains the number of these plug-ins). A maximiser raises the average level of the material (high and low level) and restricts the peak levels. This 'pushes' the 'air' out of a song. In this way producing a compact result with much more 'loudness'. Take care not to overdo this because this will also reduce the dynamics of your song. In addition, extreme compression can cause all kinds of 'pumping and sucking' noises in the louder parts of your mix.
- Possibly a stereo 'spreader' to give your sound some extra width (take care with this because it can also sound very unnatural, especially if you play such a track in mono).
LUFS and loudness
Around 2000 started a period in which commercial CDs were mastered increasingly louder. An example (2008) is Metallica's album Death Magnetic. Just search the internet for 'Loudness war' to read more about that. Not everyone was happy about this, and fortunately we now see a trend towards more dynamics instead of more loudness. A few years ago a standard (LUFS - Loudness Units relative to Full Scale.) was developed for the loudness of (music) broadcast on TV, radio and video, coupled with a measure for the dynamics of a song (DR = Dynamic Range). Unfortunately, there is a lot of discussion about how to apply this, mainly because you can not compare a metal track with a recording of a classical orchestra. Below an overview of the average loudness of about 10.000 singles from varying genres. It's old material (1950 - 2008) but it gives a nice starting point in deciding how loud your track should be. My tracks are between -9 and -11 LUFS. You can measure the LUF and DR of your own songs with software that can be downloaded for free on the internet.
Classical Orchestra: LUFS -16; DR 15 dB
Funk: LUFS -12.5; DR 12.0 dB
Soul: LUFS -11.5 ; DR 10 dB
Jazz: LUFS -13; DR 12 dB
Pop: LUFS - 8; DR 6 dB
House: LUFS -7.5, DR 5.5 dB
Hip Hop: LUFS -9; DR 6 dB
Heavy Metal: LUFS -8.5 DR 7.5 dB
-
Finally, you need software to convert the 32 bit format of the master wav file to 16 bit. This is the standard format for commercial audio players. For this you need a plug-in that can 'dither' your track. Often this functionality is also available in the limiter / maximizer or in the 'render / export' function of your DAW.
Very convenient is a software suite that has all the components mentioned above, and has tooling to measure audio (eg LUFS) and with wich you can can visualize the results. Izotope Ozone is an example of this and is also very user friendly. 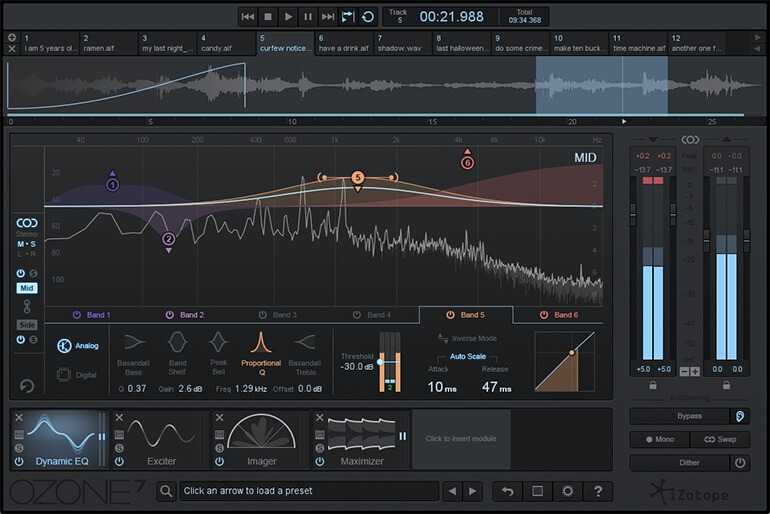 If you have made a master and reduced it to the 16bit / 44.1khz or mp3 format, listen to it on a normal stereo system. Or better, upload it to the cloud and listen to it on as many audio devices as possible, good and bad. Also, before you listen to your mix, play a song from a CD in the same style. Then listen to your song .... Well, that can be surprising (in a bad way...)! Often the problem is the amount of low-end (too much or too little bass) or the amount of highs (too shrill or not clear). Furthermore, the loudness of your song may be too low.
In that case, follow the same Mastering procedure until the result is up to standards.
If you have made a master and reduced it to the 16bit / 44.1khz or mp3 format, listen to it on a normal stereo system. Or better, upload it to the cloud and listen to it on as many audio devices as possible, good and bad. Also, before you listen to your mix, play a song from a CD in the same style. Then listen to your song .... Well, that can be surprising (in a bad way...)! Often the problem is the amount of low-end (too much or too little bass) or the amount of highs (too shrill or not clear). Furthermore, the loudness of your song may be too low.
In that case, follow the same Mastering procedure until the result is up to standards.
Do not Master for a long period of time. After a while you will get ear fatigue and chances are you will not produce a well-sounding master!
As a final check I will upload the rendered file to my smartphone and listen to it between other songs. Because I'm used to that smartphone, I can hear exactly what I need to adapt to my track: in fact, this is my point of reference.
All in all, mastering is a difficult job. You should at least take your time for it and above all, try to keep it subtle. If you have a good mix to start with, subtility is the key. If you're not satisfied with the results, go back to your original tracks and mix, and make the necessary adjustments there. This will save you a lot of time with better results to boot.
Go to index
Common problems.
Stuttering, cracking, 'crackles', 'pops', 'clicks'.
If you are recording or editing in a DAW you will notice that the use of equalizers, reverbs, compressors, delays and virtual instruments requires a lot of cpu power. Along with playing the (say) 50 tracks that you recorded, it can happen that your computer runs out of resources.
This results in missing audio parts, stuttering and cracking. There is - apart from buying a PC with more cpu power and more RAM - a solution for this:
Increase your buffer size. Especially if your buffer is set small (eg 32, 64 or 128 samples), increasing to 512 or 1024 samples will probably solve this. The latency (delay) will therefore increase, but this is not a problem if you use direct monitoring. Furthermore you should check what programs are running in the background. Close them if you don't need them.
Latency when I use a midi controller or midi keyboard
With direct monitoring, a trick is used in the sound card to get rid of any delays while recording. You play a tone, but you hear it a number of miliseconds later. The note you play has to be processed and transported and this takes time. With direct monitoring the tone you play is routed directly to the speakers and the processing is done in the background. You hear it directly, along with your previously recorded tracks (or whatever). This only works for recording analog instruments such as guitar, bass, vocals, etc.
When recording midi you need the processing power of the PC because the sound is actually made in the PC. Direct monitoring can therefore not solve delaying problems. To have as little latency or lag as possible when you use a midicontroller you need a high quality sound card (with the matching driver). Research has shown that a delay of 11 milliseconds is still inaudible (that's the delay you get when you're 3 meters from your guitar speaker). So, If you are looking for a new sound card, that is a nice reference.
When I record a guitar or vocals I always have large volume differences.
When recording it is quite normal that you get volume difference, especially when recording vocals and stringed instruments. Also noise, like pops or noise from touching the microphone can cause unwanted noise peaks.
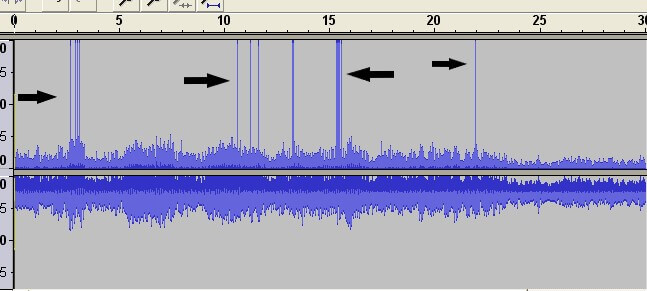
What you can do about this is to edit the track - which is in fact just a wav file somewhere in your project directory. This can be done in the audio editor of your DAW (if your DAW has one) or in an external tool. I often use 'cooledit Pro version 2.1' for this kind of audio editing. A very old tool but it works fine (I think it can be downloaded for free).
In this program I import the audio file of the track. You will see the 'wave forms' and it's easy to find the extreme peaks. You can than do a number of things: jack up or weaken specific parts (especially when it comes to pronounced peaks or valleys in the volume). You do that by zooming in on a peak and then change the volume of that part by means of a function of your editor. Then you can use a 'normalizer' to boost the total volume - if necessary - so that you get a more 'volume homogeneous' track at a sufficient level.
Of course you can also put a limiter / maximizer on the track (like you do when mastering) and make the volume more even in that way. But then you introduce compression, and maybe you don't want that.
The idea is that you first 'repair' your audio tracks before you start the mixing and mastering proces. During mixing you will no longer repair but fine-tune your audio.
Go to index